Mastering Screen Recording On FaceTime: Your Ultimate Guide
In our digital age, video calls have become an integral part of our communication, and FaceTime stands out as one of the most popular platforms for this purpose. Whether you're connecting with family, collaborating with colleagues, or sharing memorable moments with friends, screen recording FaceTime can be an incredibly useful tool. As the demand for capturing these virtual interactions grows, many users are left wondering how to effectively record their FaceTime calls without any hassle.
Screen recording FaceTime allows users to save conversations for later viewing, share important discussions, or even create tutorials to assist others. However, navigating the technical aspects of screen recording may seem daunting for some. This comprehensive guide aims to demystify the process, providing step-by-step instructions, tips, and troubleshooting advice for a seamless recording experience.
In this article, we will explore various aspects of screen recording FaceTime, including how to enable the screen recording feature, the best practices for recording your calls, and the legalities surrounding recording conversations. By the end of this guide, you'll be equipped with all the knowledge you need to confidently record your FaceTime calls and cherish those moments forever.
What is Screen Recording FaceTime?
Screen recording FaceTime refers to the process of capturing video and audio during a FaceTime call. This feature allows users to save their conversations or interactions for personal use, sharing, or educational purposes. The ability to record these calls can be particularly valuable for professionals conducting virtual meetings or for those who want to preserve special moments with loved ones.
How to Enable Screen Recording on Your Device?
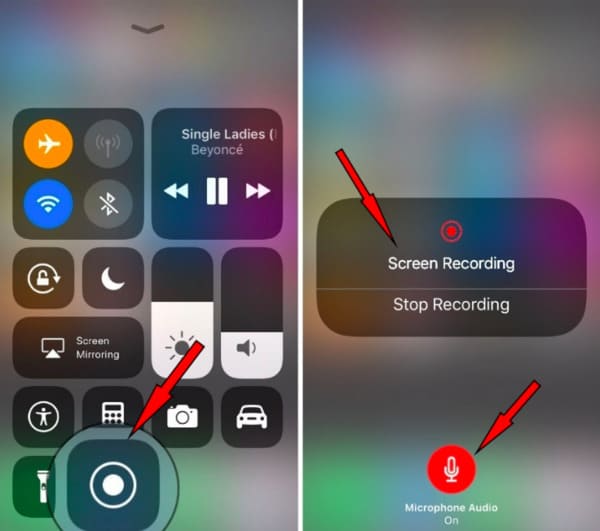
To start recording your FaceTime calls, you must first ensure that screen recording is enabled on your device. Here’s how to do it:
- Open the "Settings" app on your iPhone or iPad.
- Tap on "Control Center."
- Select "Customize Controls."
- Find "Screen Recording" and tap the green plus icon to add it to your Control Center.
Once added, you can easily access the screen recording feature whenever you need it.
How to Record a FaceTime Call Step-by-Step?
Now that you’ve enabled screen recording, follow these steps to record your FaceTime call:
- Start your FaceTime call as usual.
- Swipe down from the top-right corner of your screen to access the Control Center.
- Tap the "Screen Recording" button (the circle within a circle).
- You will see a countdown of three seconds before the recording starts.
- Once you finish your call, return to the Control Center and tap the "Screen Recording" button again to stop recording.
Your recorded video will be saved in the Photos app, ready for you to review or share.
Are There Any Limitations to Screen Recording FaceTime?
While screen recording FaceTime is a valuable feature, there are some limitations to consider:
- Recording quality may vary based on your device's storage and performance.
- Some audio issues may arise if the microphone is muted or if your device is not configured correctly.
- Privacy concerns related to recording conversations without consent must be taken seriously.
Is it Legal to Record FaceTime Calls?
The legality of recording FaceTime calls can vary depending on your location. In many places, it is legal to record calls as long as at least one party is aware of the recording. However, some jurisdictions require the consent of all parties involved. Always ensure you are familiar with local laws regarding call recording before proceeding.
How to Share Your Screen Recording Facetime?
After recording your FaceTime call, you may want to share it with others. Here’s how you can do that:
- Open the Photos app on your device.
- Locate the screen recording video in your library.
- Select the video and tap the "Share" icon.
- You can choose to share it via AirDrop, Messages, Email, or social media platforms.
What are the Best Practices for Screen Recording FaceTime?
To ensure the best experience while recording your FaceTime calls, consider the following best practices:
- Always inform the other party that you are recording the call.
- Test your recording settings before important calls to ensure everything works properly.
- Choose a quiet location to minimize background noise.
- Check your device’s storage space to prevent interruptions during recording.
How to Troubleshoot Common Issues with Screen Recording FaceTime?
If you encounter issues while recording your FaceTime calls, here are some troubleshooting tips:
- Ensure that your device is updated to the latest software version.
- Restart your device to resolve temporary glitches.
- Check your microphone settings if audio is not being recorded.
- Free up space on your device if recordings are not saving.
Conclusion: Embrace the Power of Screen Recording FaceTime!
Screen recording FaceTime is a powerful tool that can enhance your virtual communication experience. Whether for personal memories, professional documentation, or educational tutorials, knowing how to effectively record and share your FaceTime calls can be incredibly beneficial. By following the steps outlined in this guide and adhering to best practices, you can capture your important conversations and cherish them for years to come.
Unraveling Justin Bieber's Rise To Fame: How Old Was He When It All Began?
Discovering The Multifaceted World Of Harry Connick Jr.
Discovering The Multifaceted Talent Of Harry Connick Jr.


